 Are you using WordPress’ formatting features to their fullest?
I expect you already know the basics of formatting your blog posts to make them more readable. (If you’re just getting started, you might want to check out 4 WordPress Formatting Tips to Make Your Posts More Readable for an overview of the basics.)
But many bloggers – even experienced ones – don’t realise just how many formatting features are built into WordPress.
Understanding the WordPress WYSIWYG Editor
Whether you write your drafts in the WordPress editor or elsewhere, it’s important to be familiar with the WordPress WYSIWYG toolbar and know what all those buttons do.
WYSIWYG (pronounced “wizzy-wig”) stands for “What You See Is What You Get”, and describes any interface where you can see how your text will actually look as you apply various types of formatting to it. Microsoft Word, Google Docs and WordPress are all WYSIWYG editors.
Whenever you create a new post or page in WordPress, you should see the WYSIWYG editor. The toolbar (the buttons along the top) looks like this:
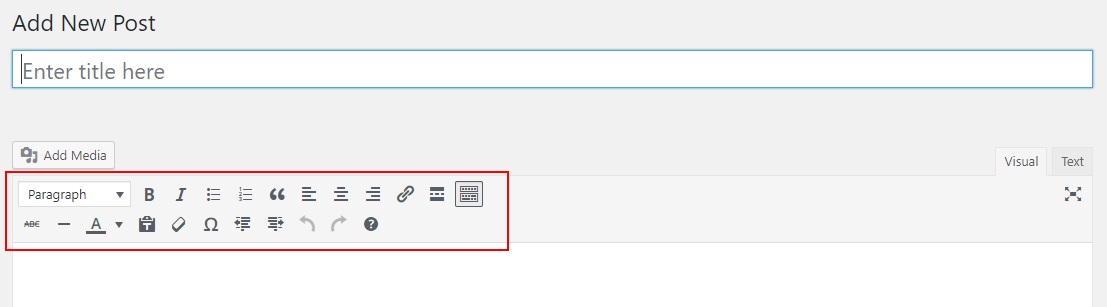
(If you don’t see these buttons, make sure you’re using the “Visual” rather than the “Text” version of the editor. You can swap between the two using the tabs on the right-hand side of the box where you write your post.)
If you’ve written and formatted your post in another WYSIWYG editor and copied the text into WordPress, some of the formatting may have been preserved. But some formatting options, such as blockquotes and horizontal rules, can only be applied in WordPress.
(Don’t worry if you have no idea what “blockquotes” and “horizontal rules” are. You’ll know all about them, and how to use, them by the end of this post!)
Even if some of the buttons look confusing right now, they’re all straightforward to use. We’ll take the toolbar one row at a time.
The Top Row of the Toolbar: The Most Common Formatting Options
The buttons are divided into two rows. The top row contains the options you’re likely to use most frequently.
Here they are:

We’ll go through them one by one:
#1: “Paragraph” Dropdown
![]()
HTML tag equivalent: <h1>, <h2>, <h3>, etc. and <pre>.
This dropdown menu lets you format your text using heading styles:
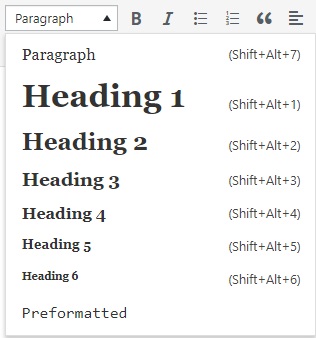
Heading 1 is used for the title of your post, and so should be avoided for subheadings within your post.
Most bloggers use Heading 2 for their main subheadings and Heading 3 for any subheadings nested beneath those. (In this post, for instance, the subheading The Top Row of Buttons: The Most Common Formatting Options is Heading 2, and the subheading #1: “Paragraph Dropdown” is Heading 3.)
The “Preformatted” option can be used if you’re including sections of code in your post. it will display the text exactly as written using a monospaced font.
#2: Bold Text
![]()
HTML tag equivalent: <strong>
The button that looks like a B is probably familiar to you from Microsoft Word and other programs. It makes your text bold like this.
To use it, you can either:
- Click the “B” button, type the text you want in bold, then click “B” again to turn back to normal text.
- Type your text as normal, then highlight the portion you want in bold and click “B”.
Use it for: Emphasising a key sentence, or creating a subheading where you don’t want to use a heading style.
#3: Italic Text
![]()
HTML tag equivalent: <em>
The button that looks like an I is probably also very familiar. It makes your text italic like this.
Use it for: Emphasis on a particular word, or for a sentence or two of explanatory text (e.g. a note at the start of your post saying This is the first in a four-part series).
#4: Unordered List (Bullet Points)
![]()
HTML tag equivalent: <ul> for the list, <li> for each item on the list
The button with three dots and lines might look a bit like Morse Code, but it’s actually used to create a bulleted list (also known as an “unordered list”) like this:
- Item one
- Item two
- Item three
Use it for: A list where the order or number of items doesn’t particularly matter. If each item on your list is more than a paragraph long, you’ll probably want to format your list differently (e.g. using subheadings).
#5: Ordered List (Numbers)
![]()
HTML tag equivalent: <ol> for the list, <li> for each item on the list
The second list button is for a numbered list (also known as an “ordered” list) like this:
- Item one
- Item two
- Item three
Use it for: A list where the number or ordering of items matters (e.g. you’re giving step-by-step instructions or writing a top ten list).
For more help with lists, check out my post How to Use Lists Effectively in Your Blog Posts.
#6: Blockquote
![]()
HTML tag equivalent: <blockquote>
Blockquote (or block quotation) formatting is used to style quoted text so (normally) it has a wider left margin than the standard text. Depending on your blog’s theme, the blockquote text may also be in a different font and have quotation marks alongside.
This is how blockquotes look on the ProBlogger blog.
Use it for: Any quote from someone other than you that’s more than a few words long. Very short quotes can be placed within quotation marks in a sentence.
#7: Align Left/Center/Right
![]()
HTML tag equivalents: <p>, <p style=”text-align: center;”>, <p style=”text-align: right;”>
By default, your text will be left-aligned (flush with the left-hand margin). But you can also align your text so it’s centered or right-aligned.
This text is centered.
This text is right-aligned.
Use it for: Creating a sales page or special offer, where it might make sense to center your text. Some bloggers even use centered text for poems or other slightly unusual types of content.
#8: Link/Unlink
![]()
HTML tag equivalent: <a href>
This button lets you turn text into a link that readers can click to visit a different post or page. Simply type the text (e.g. the title of a post), then highlight it and click the link button. You’ll see this:
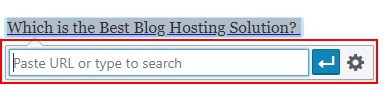
You can then paste in the URL (web address) of the page/post you want or, if it’s on your own blog, you can search for the page/post by title.
Your link will show up like this:
Which is the Best Blog Hosting Solution?
Use it for: Internal links to your own posts (good for SEO and encouraging readers to stick around longer on your blog), and external links to other people’s posts or other resources (good for demonstrating your knowledge/expertise within your field, and for building relationships).
#9: Read More Tag
![]()
WordPress tag equivalent: <!–more–>
Some blog themes show multiple posts on the front page or index page. A “read more” tag breaks the post into two parts: the first part will appear in the index, and the rest will only be shown once the reader clicks “read more” (or clicks on the post title).
Other themes are designed to show only an excerpt from the post (auto-generated or hand-crafted), so you won’t need a “read more” tag. You can see this in action on our own “Blog” page.
Use it for: Breaking off posts after the introduction, or if you want to show part of each post rather than full posts on your home page/blog index page.
#10: Toolbar Toggle
![]()
WordPress tag equivalent: n/a
The “Toolbar Toggle” lets you show/hide the second row of icons on your toolbar. (It used to be called “Show/Hide Kitchen Sink”, which you might recognise if you’ve been blogging for a long time.)
Use it for: Viewing the second row of toolbar buttons. Or hiding them if you find them distracting or only have a small screen to work with.
The Bottom Row of the Toolbar: Less Common Formatting Options

While you might not use these buttons very often, it’s useful to know what they do just in case you need them.
Again, we’ll take them one at a time starting on the left.
#1: Strikethrough Text
![]()
HTML tag equivalent: <del>
Strikethrough text is crossed out, like this. As with bold and italic, you can click the strikethrough button then type, or you can highlight existing text and apply strikethrough formatting to it.
Use it for: Humorous effect (if that suits your blogging tone), or for special offers on your products (you can “cross out” the normal price and display the offer price).
#2: Horizontal Rule
![]()
HTML tag equivalent: <hr />
The horizontal rule creates a line that runs across your post. It can be useful for breaking a post into one or more visual sections (although it doesn’t act as a “read more” tag).
It looks like this:
Use it for: Setting off the start or end of a post (e.g. if you’re introducing a new series of blog posts at the start, or making a special offer at the end).
#3: Text Color
![]()
HTML tag equivalent: <span style=”color: #ff0000;”> (for the color red)
Your text will default to the colour set by your blog’s theme – normally black or very dark grey.
Sometimes, you might want to put text in a different colour. You can do this by either:
- selecting the colour, using the A dropdown, then typing
- highlighting existing text and then choosing a colour for it.
After you click on the dropdown, you can pick a colour simply by clicking on it:
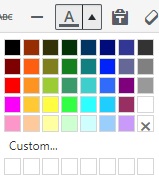
If you prefer, you can create specific custom colours by clicking “Custom…” and then setting the RGB values.
Use it for: Occasional coloured text, perhaps to highlight a special announcement or offer. Be careful not to go overboard with different colours in your posts. You might want to use the “custom” colour option to match special coloured text to the colour palette of your header or branding in general.
#4: Paste as Text
![]()
HTML tag equivalent: n/a
Most of the time you’ll want to paste text into the WordPress editor and keep its formatting. If you paste text that you drafted in Word, most of the formatting will automatically copy across too.
But sometimes you may want to paste text without the formatting. Simply click this button, which looks like a T on a clipboard, to toggle the “paste” function to “plain text mode”.
From now on, when you paste text, all the formatting will be removed. (You can click it again to toggle back to the normal mode.)
Use it for: Pasting formatted text (e.g. blog post titles that are formatted as a header, when you don’t want to keep any of the formatting). Remember to toggle it back off again if you only want to use it temporarily.
#5: Clear Formatting
![]()
HTML tag equivalent: n/a
To remove formatting, you don’t need to get rid of each instance of bold, italic, coloured text, etc. individually. Instead, you can use the “Clear Formatting” button, which looks like an eraser.
Simply highlight the formatted text you want to change and click the button.
Use it for: Getting rid for formatting that you don’t want. That might be formatting that you accidentally applied, or formatting that’s appeared when you’ve copied text into your post.
#6: Special Character
![]()
HTML tag equivalent: n/a, though individual characters will have a special ASCII code
Occasionally, you might want to include a special character in your post or page that you can’t actually type, such as the copyright symbol ©.
To use this feature, position your cursor where you want the special character to appear, then click the Omega symbol to open a panel of special characters and select the one you want:
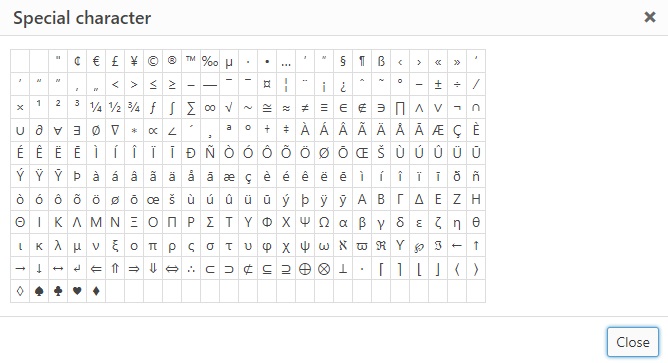
Use it for: Inserting a copyright notice with ©, using a Registered ® or Trademark ™ character when writing about your products/brand or someone else’s (if appropriate), or inserting any other special character!
#7: Increase/Decrease Indent
![]()
HTML tag equivalent: <p style=”padding-left: 30px;”>
If you want to indent text (push it over to the right), you can use this feature. The right-hand button of the two creates the indent; you can click it again to increase the indent.
Use the left-hand button to reduce or remove an indent that you’ve created.
Use it for: You might choose to set off specific text using an indent and perhaps a different colour too (e.g. if giving an example within a “how to” step).
#8: Undo/Redo
![]()
HTML tag equivalent: n/a
You’re probably already familiar with these buttons from your usual word processor. Use “Undo” (the arrow pointing to the left) to undo whatever you just did. Use “Redo” if you change your mind again.
Use it for: Easily undoing an action (e.g. if you applied formatting you realise you don’t want, or you accidentally deleted your whole post and want it back).
#9: Keyboard Shortcuts
![]()
HTML tag equivalent: n/a
Most of the toolbar functions also have a keyboard shortcut, so you can easily use them without having to move your hands from the keyboard to the mouse. Click the ? button to see them in a handy list:
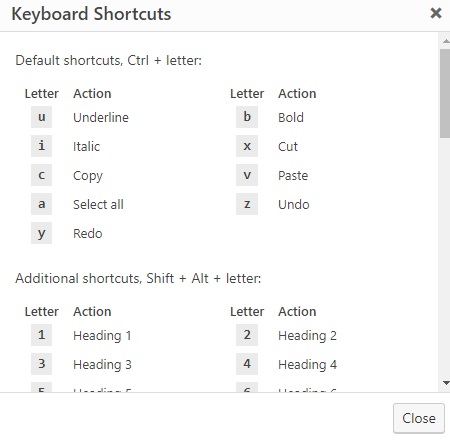
Some of these shortcuts may be familiar from other programs, such as Ctrl+B for “bold text” and Ctrl+Z for “undo”.
But there are others here that are specific to the WordPress editor, such as Shift+Alt+m to insert/edit an image.
Use it for: Speeding up your workflow, especially if there’s a particular type of formatting you use a lot.
While the WordPress toolbar buttons might not be the most thrilling aspect of blogging, being able to format your posts and pages effectively can really make a difference. Well-formatted posts look professional and are easy to read, and well-formatted pages can do a better job of converting prospects into leads or customers.
Is there a new feature you’ll be using in your next blog post, or on one of your pages? Which one will you be trying out?
Or did you learn about a feature you never even realised existed? Let us know in the comments.